
Motorcycle Headlight and Auxiliary
Light Visor installation
instructions.
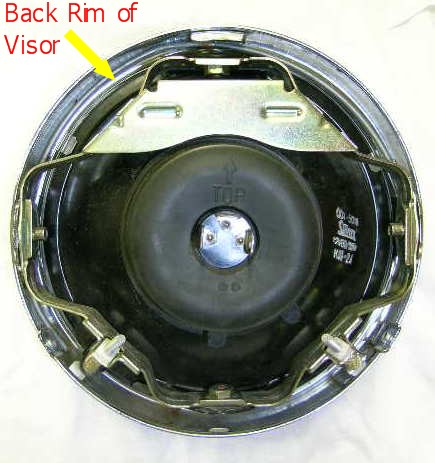
Picture below shows a Honda
7" Headlight assembly.
Visor is installed.
 |
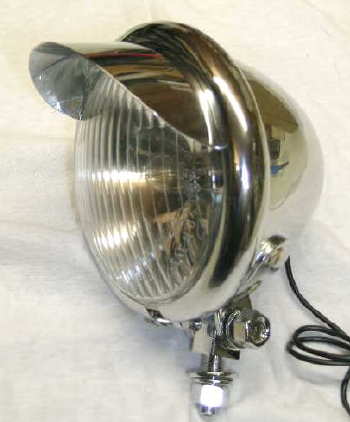
4.5" Auxiliary light shown
with plain visor
installed.
 |
Visor Installation:
- Remove total light assembly from the light housing. Usually a
couple of bolts on the side. For Headlights, pull the 3 pin connector off the light, (it
might pull off hard).
- Now you want to remove the light from the outer chrome ring.
With driving lights, a lot of times there are just clips holding the light in.
With headlights, a lot of times there are a couple of side screws holding the
light along with one clip. With a headlight you might have one adjustment
screw attaching from the outside ring to the light assembly, measure the
distance on this adjusting screw so you can set it back to that distance.
Remove holding screws then retaining clip.
- A second person to hold everything for re assembly makes life a lot
easier. Center the visor in the ring. Then insert the light assembly
into it. Hold everything together, have the second person hold the
assembly facing down on a bench. Re-install the retaining clip, this
is what holds the visor. Re install mounting bolts and adjustment screws.
- Note: For headlights, the visor should
seat against the headlamp glass and be held in place with the headlamp ring. Do
not attempt to fit it to the outer chrome housing ring, as it will not fit.
When finished you might have some slight movement on the headlight
visor, in
the very top center. This depends on the type of bike and headlight.
For that custom chrome look,
finish off the wiring with some available
Chrome Cable Covering.
Below are specific instructions for Light Visors installed on 4 1/2" Auxiliary Lights sold by Value-Accessories.
These instructions are
the same for most other Auxiliary lights.
|
Auxiliary 4 1/2" Light, Visor Installation:
-
Remove lower outside chrome ring
bolt.
-
Pull ring apart and remove by
pulling bottom away from the light first then moving up.
-
Place the 4 1/2" Visor inside the
front edge of the chrome ring.
-
Starting at the top, install the
ring on the light working your way to the bottom.
-
Make sure everything is lined up
straight, then re-install the lower ring bolt.
-
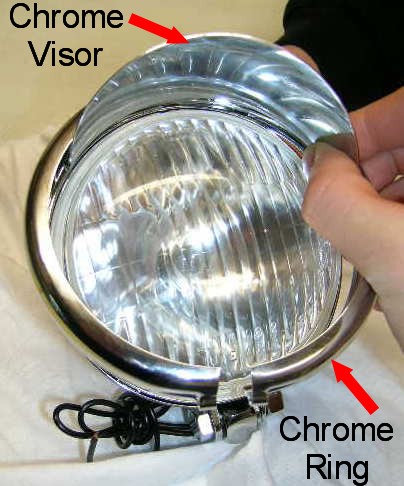
Picture below shows ring being
re-installed with visor.
|
 |
|
4 1/2" Auxiliary Flat Light,
Visor Installation:
-
Remove the bottom bolt.
-
Remove the light assembly from rear
housing.
-
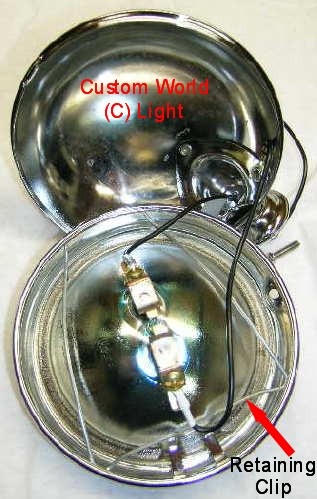
Remove retaining clip, then remove
light from the outer chrome ring.
-
Place the 4 1/2" visor inside the
chrome ring.
-
Insert the light back in the ring
assembly and secure with the retaining clip.
NOTE: A 2nd person is extremely
helpful for holding the assembly while installing the clip
These
flat lights with a sealed beam are virtually identical to most other
lights that you are going to find out there that look similar. The
instructions here will be the same. |

|


Copyright © 2002 - 2014 Value-Accessories


